Content Operator
Introduction
Here at Campus Production (CP), we utilize two content machines for Convocation and Campus Community. We refer to them as “Mac 1” and “Mac 2”.
Mac 1 is responsible for all graphics, lower thirds, and videos.
Mac 2 is responsible for lyrics and clocks.
While each machine has unique responsibilities, they also serve as backups for each other.
Your role as a content operator is extremely important, as it impacts several key parts of the show. It is crucial to be thorough, detail-oriented, and precise.
Additionally, we’d like to remind you that you are able to download ProPresenter for free to learn the software outside of the control room. You can download it by clicking here.
Expectations for your role
Before show, go through this list and ask yourself if you’ve done these things.
Mac 1
- Have I imported all content?
- Have I tested playback of all videos with the Director and Broadcast A1?
- The video should be played back in full, with no observed errors.
- Have I imported the lyric bundle from Mac 2?
- Typically, this is sent after rehearsal.
- When is the last time I checked Dropbox? Does the content I have match what is in Dropbox?
Mac 2
- Have I imported all lyrics?
- Have I verified that lyrics are error free?
- Have I sent my lyric bundle to Mac 1?
- Have I imported all content?
- When is the last time I checked Dropbox? Does the content I have match what is in Dropbox?
Operation Guides
Powering on your machine
- Turn on your monitors. The power buttons are on the lower right hand side of the bezels.
- Press Shift+Shift+O, then navigate to your machine by using the arrow keys. It will either be MAC A 01 or MAC A 02.
- Press Enter.
Importing content
Locate run of show
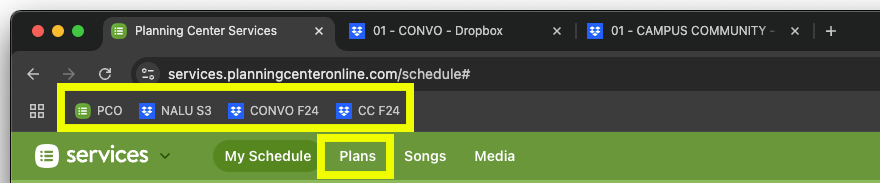
- Open Google Chrome. Planning Center and both Dropbox folders should open. (If Planning Center doesn’t open, click “Planning Center” bookmark)
- Navigate to the “Plans” section in the header
- You will then be able to find your run of show.
Locate content folders
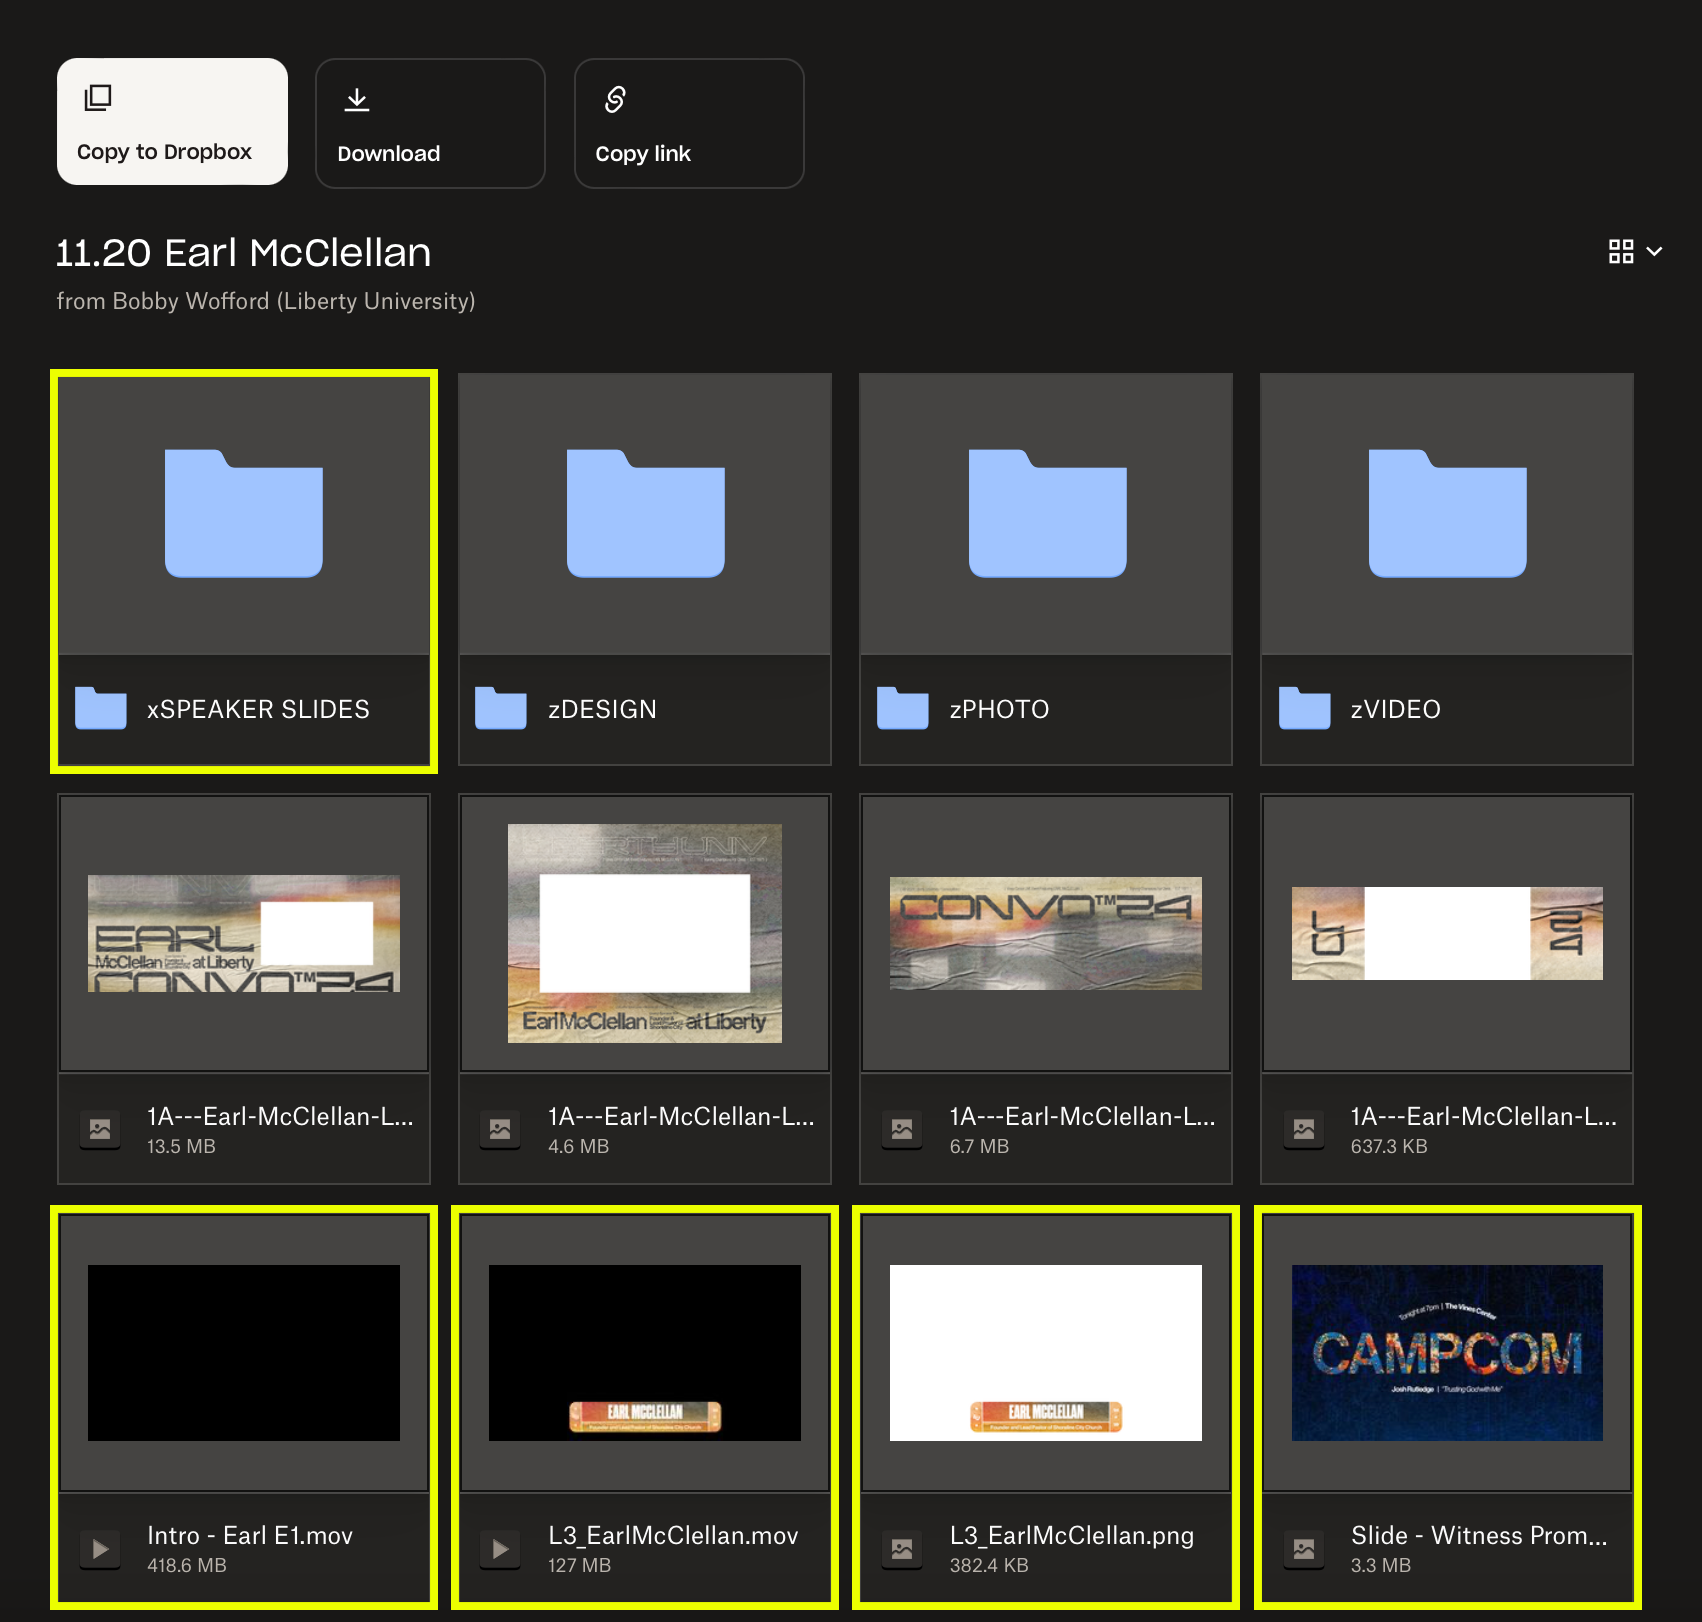
- Open Google Chrome. Planning Center and both Dropbox folders should open. (If Dropbox doesn’t open, click the bookmark for the event you’re working. It will either be Convocation or Campus Community)
- Navigate to the folder for your event
- Download “xSpeaker Slides” folder, and all content in the root folder. Do not download LED Backgrounds.
Download NALU
- Open Google Chrome
- Click the bookmark for NALU
- Download the most current version of NALU
Organizing content
Smart Playlists
We use Smart Playlists to get content into ProPresenter. A Smart Playlist is a special type of Media Playlist that looks at a folder on your computer and automatically adds and removes media based on the folder on your computer. You cannot manually add or remove Smart Playlist media directly inside of ProPresenter, instead that would have to be done via the operating system on the computer; open the operating system and add or remove your media from that folder and ProPresenter will instantly update to reflect the change.
Here’s what to do to load all content in correctly:
- Download all content from Dropbox
- Move your content into the appropriate folders on macOS.
Below is an example of what you should see when you navigate to the Documents folder on the Mac that you’re using. This example is for Convocation. For Campus Community, follow the same process in the folder for that event.
DirectoryConvocation
DirectoryConvo_Bails bail slides go here
- ConvoBail.png
DirectoryConvo_FS full-screen slides go here
- CommunityGroups.jpg
DirectoryConvo_L3 lower-thirds (LR3) go here
- SpeakerSlide1.png
- SpeakerSlide2.png
- LR3_JohnAppleseed.mov
DirectoryConvo_Preroll preroll content goes here
- OpenSeating.jpg
- Coffeehouse.png
DirectoryConvo_Videos videos go here
- IntroVideo.mov
- NALU_382.mov
DirectoryLead_L3 leadership lower-thirds go here
- LR3_DondiCostin.mov
- LR3_JonathanFalwell.mov
DirectoryLocators locators go here
- VinesCenter.mov
- Arena.mov
- TRBC.mov
You should now see content populating in your media bin. If you do not see the media bin, click the cloud button to pull it up, or press Ctrl+V.
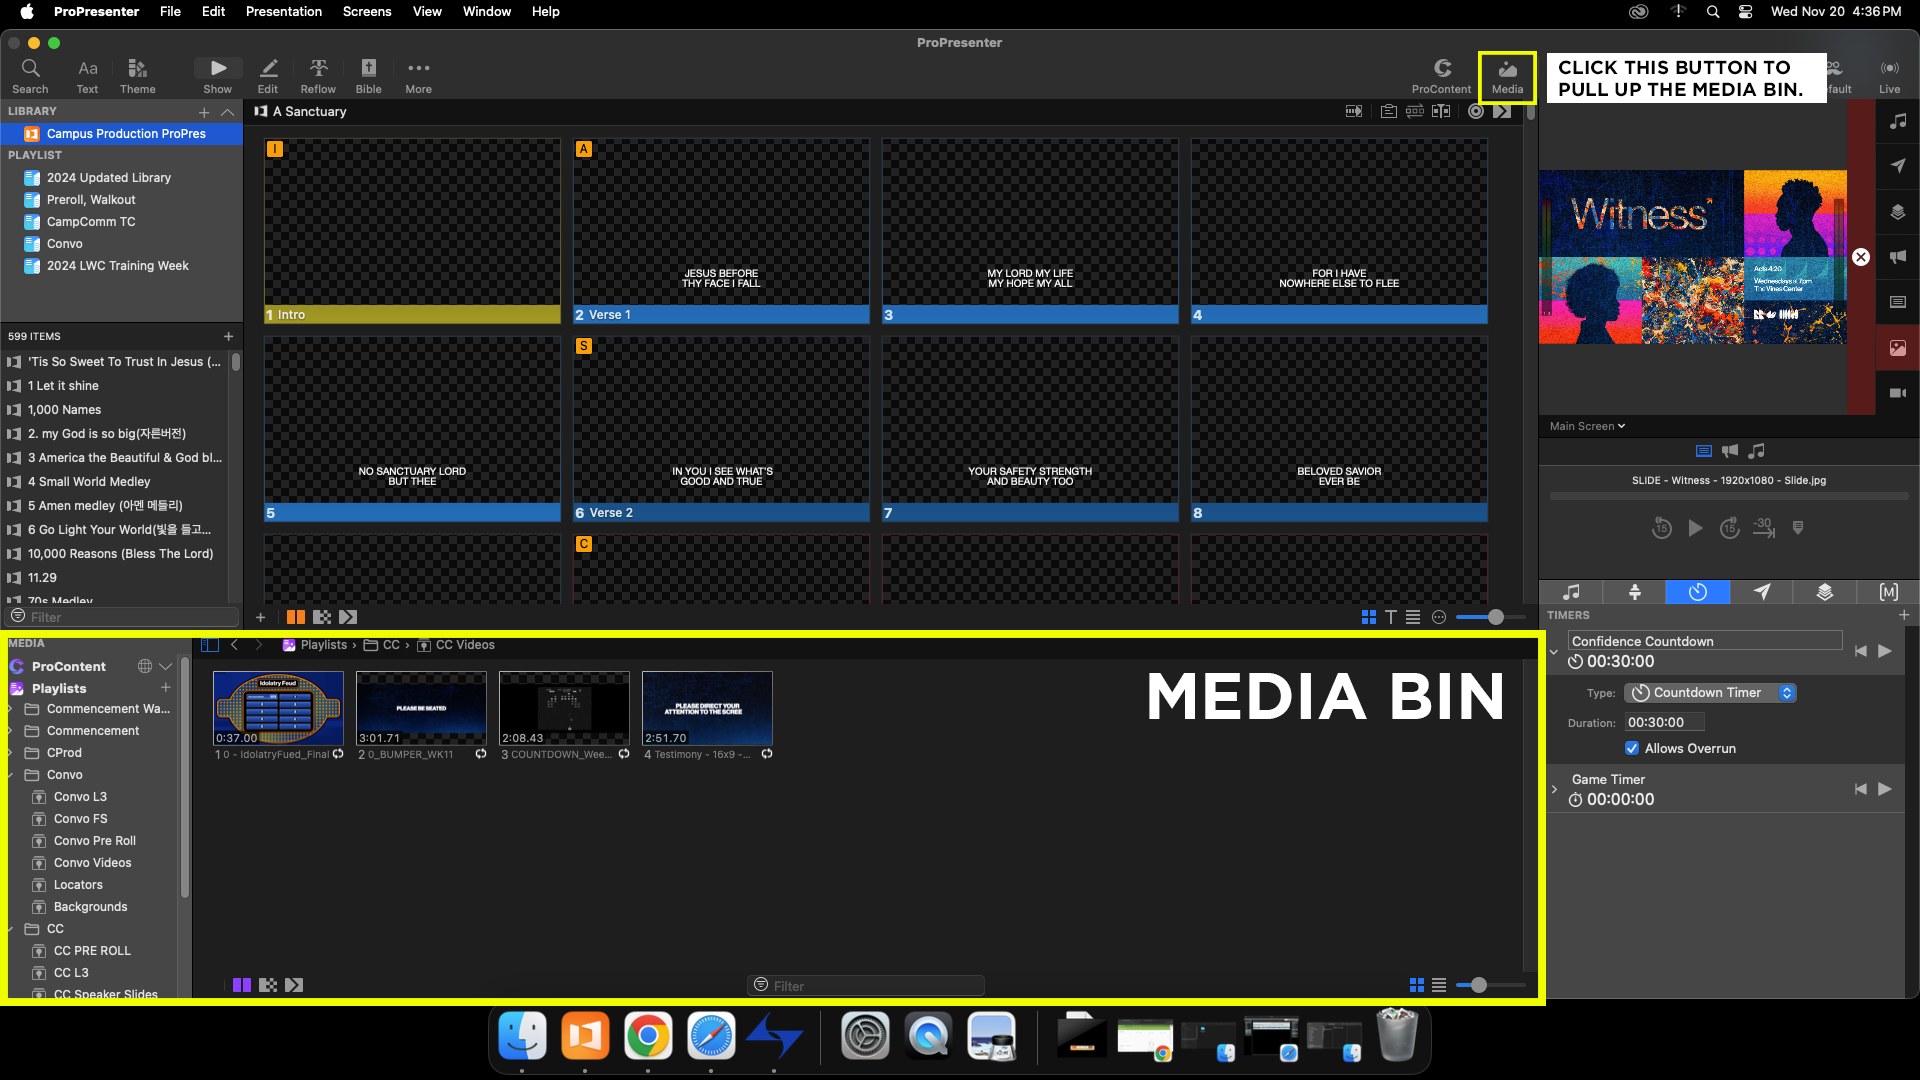
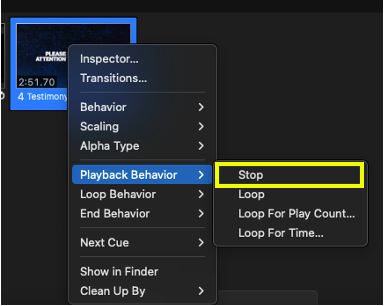
Next, it is crucial to ensure that all videos are set to stop, and not loop.
- Right click video
- Select “Playback Behavior”
- Select “Stop”
- Repeat for all videos
Finally, organize the content to sort by file name in ProPresenter. (Right click, clean up by, name)
Verifying Video Playback
We verify all video playback to ensure that videos are the correct length, audio is correctly split, lip sync is good, and that video looks good.
When it’s time to verify videos, either the Broadcast A1 or Director will communicate with you that it is time to do so. Here’s what you need to do:
- Cue video that is requested
- Play video when requested
When verifying playback of NALU, skip ahead to a part of the video where the hosts are speaking on camera. This saves us time.
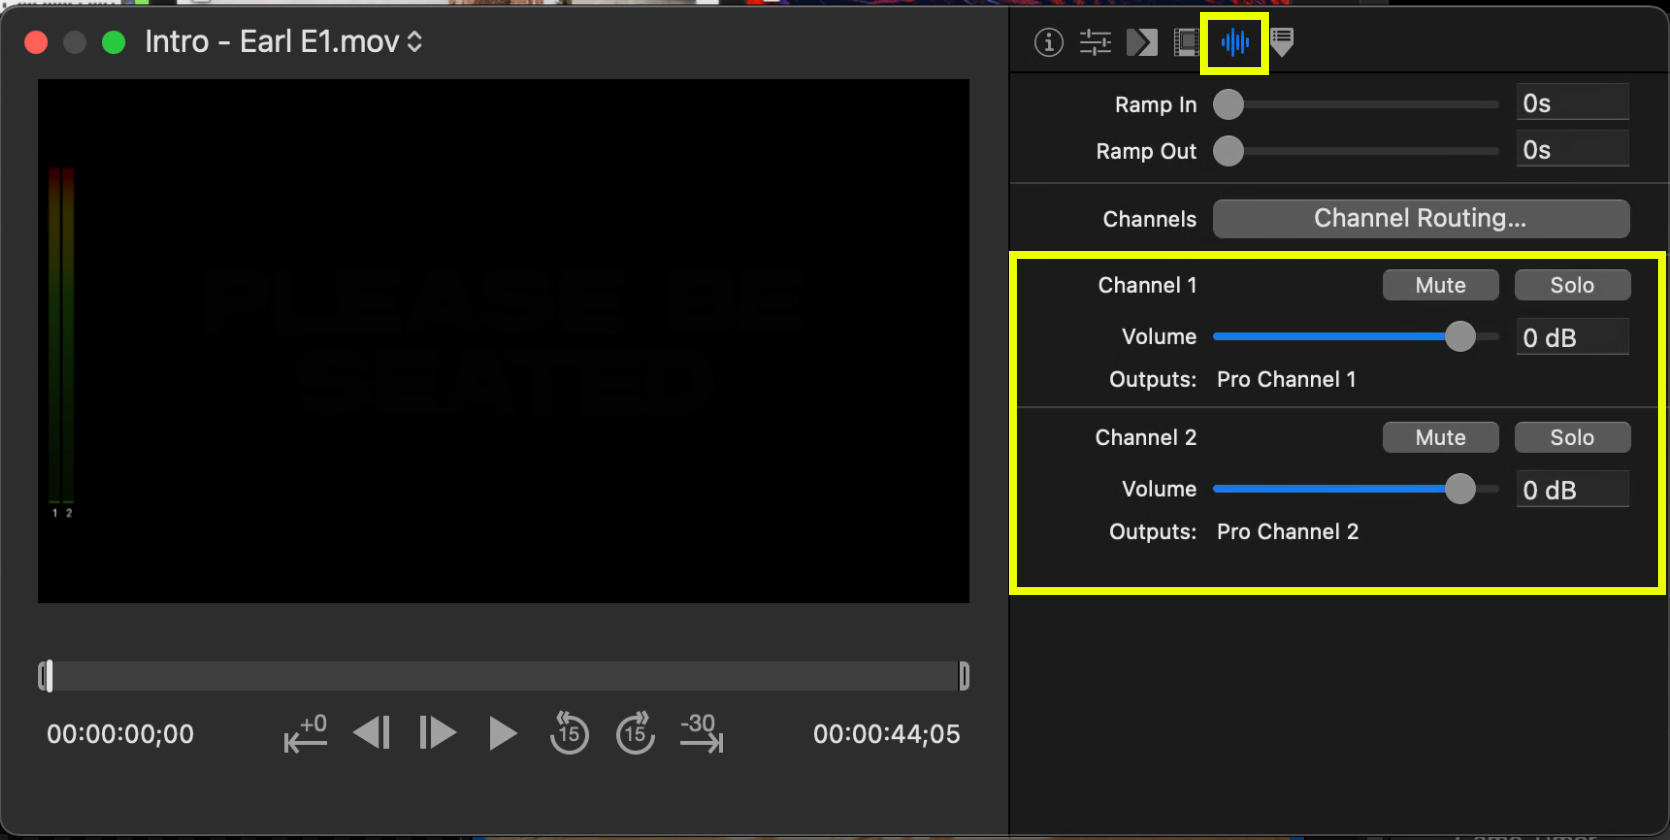
Adjusting video volume
Occasionally, videos will get sent to us that are too hot (loud) or too soft (quiet). We can lower the volume in ProPresenter’s “Inspector” tool. Here’s how to do it:
- Right click on the video that you need to change
- Select “Inspector”
- Navigate to the audio section
- Raise or lower both Channel 1 and 2 by the same amount
- When adjusting volume, adjust in 3dB increments unless told otherwise
Verifying Content Version
Content for show can change on a dime. It is imperative that both machines have the most current content. Here’s the recommended way to check:
- Navigate to Dropbox folder for the show and refresh the page
- Navigate to Media Bin in ProPresenter
- Verify all content is on your machine
- Compare your content in ProPresenter with the content in Dropbox to make sure they match
- After the production manager has confirmed that content is final, redownload all content.
Importing Lyrics
- Using the instructions above, locate the run of show via Planning Center. You’ll find the songs needed here.
- Once songs are identified, you’ll need to import them into the playlist for the current event.
- Most songs are in our Campus Production song library, but occasionally we will play a new song. Refer to Importing a new song to manually import a song.
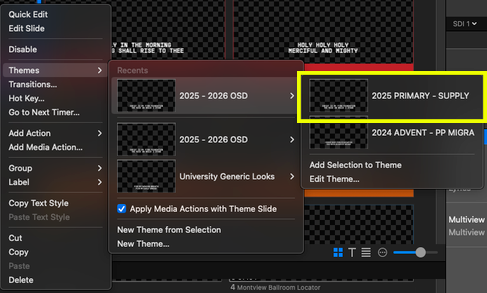
- Once all songs are imported, perform the following checks for all songs
- Ensure lyric theme is 2025 PRIMARY - SUPPLY
- Ensure all lyrics have proper spelling and grammar
- Ensure arrangement of lyrics is correct (Planning Center may have this)
Common spelling and grammar mistakes
Spelling
- UK English vs US English. Saviour > Savior
Grammar
- Remove all of the following:
- Question marks (ex: Do you feel the world is broken?)
- Commas (ex: Holy, holy, holy, Lord God Almighty)
- Periods (ex: Early in the morning our song shall rise to thee.)
- Quotations (ex: You say “I am loved”)
- Exclamation points (ex: Praise!)
- Apostrophes are ok to keep in. (for example: He won’t fail)
- When in doubt, ask the director.
Rehearsing with the band
It is key that you are always following lyrics while the band is rehearsing. This allows you, the music director (MD), and the band to all confirm lyric arrangement is correct.
Remember that you’re not following the vocalists, you’re leading them. Practically, this means advancing to the next lyric slide before the lead vocalist hits the last word of the current slide.
Importing a new song
Occasionally, the collective plays songs that we do not have in our ProPresenter library. This means that you’ll have to manually import the song.
- First, locate lyrics to the song.
- Planning Center is a good first place to look. You can also try MultiTracks or Google.
- Select all lyrics, and copy to your clipboard
- File > Import > Text from Clipboard
- Select Edit
- Change title to title of song
- Go through and add slide breaks (Alt+Enter)
- Group the slides accordingly (Verse, Chorus, etc…)
- When complete, hit import button
Backups
Both Mac 1 and Mac 2 should have all content required for show, exactly mirroring each other. This is done so that in the event of a machine failure, we can failover seamlessly without affecting the event.
Mac 1 Procedure
- After rehearsal ends, the Mac 2 operator will export a bundle.
- You will find the exported bundle in the 1_ProPres Bundles folder.
(/Volumes/NL-CP-Fall2025/7_File Transfers/1_ProPres Bundles) - Double-click the bundle, and it will import in ProPresenter.
Mac 2 Procedure
- Select all songs that will be used for show.
- Right-click, and select “Export as Bundle”
- Set the file name to “YYYYMMDD_Event_Machine”. (ex: 20250905_Convo_Mac2)
- Set the save destination to the 1_ProPres Bundles folder
(/Volumes/NL-CP-Fall2025/7_File Transfers/1_ProPres Bundles) - Notify the Mac 1 operator that your bundle has been exported.
Countdowns
Countdowns in ProPresenter can be slightly frustrating to set up.
- Select the “Timers” view
- Change duration of the “Confidence Countdown” timer (format is hh:mm:ss , so if you needed 30 minutes, you’d enter 00:30:00)
- Hit Enter
- Reset timer to lock in changes. This often gets missed.
- Start timer
Tally
Tally is what tells you if you’re live. To see if you’re currently live, look at this area of the Multiview wall:
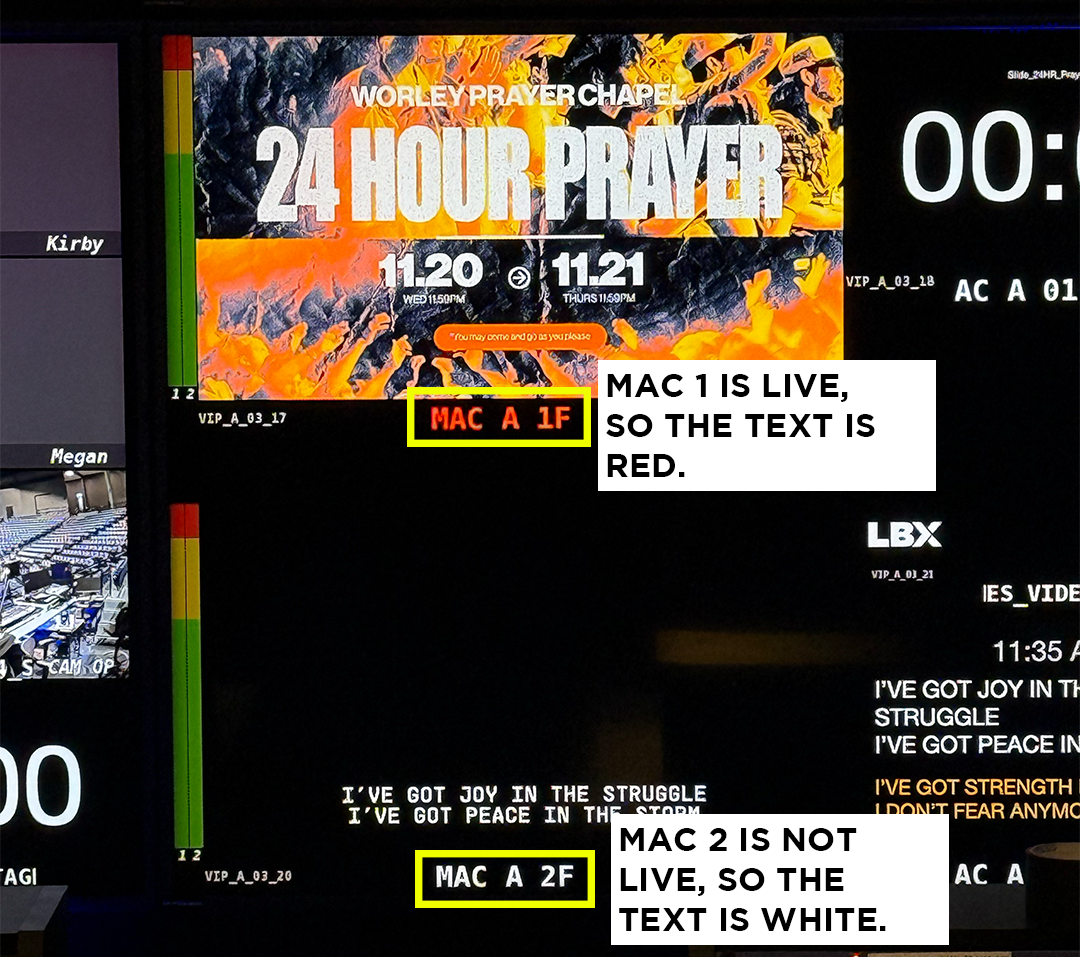
If you’re live, the text will be red. If the text isn’t red, you’re clear! When in doubt, ask the director if you’re clear!
Comms
Click here to read our guide to intercom.
| Channel | Description |
|---|---|
| GLUV | Primary communication channel for graphics and director |
| VOX | Vocal mics. Useful for if we do not have program audio. |
| CLICK | Click track |
| TB | Music director talkback |
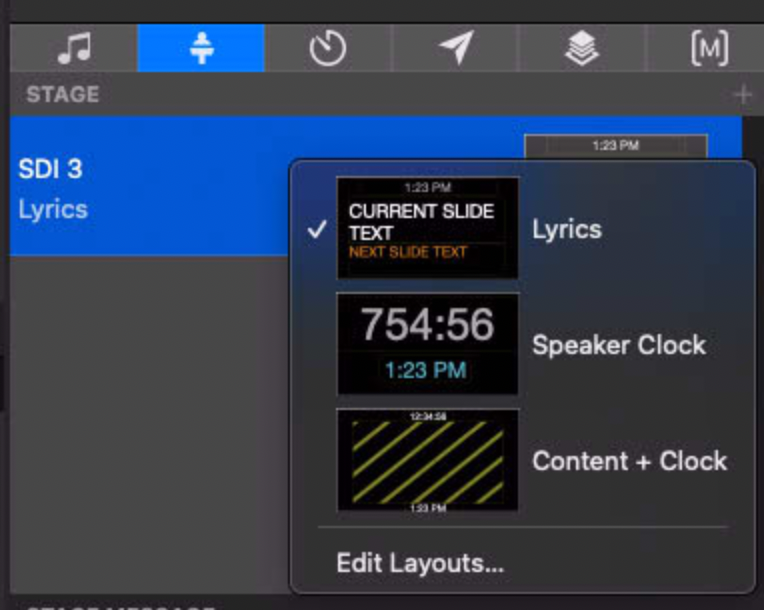
Stage Display
Your stage display is what is displayed on all of the TVs by the stage. It’s what the band and talent reference, so it’s important that it’s correct. To change the stage display, reference the image.
Cueing Videos
Cueing a video allows it to be ready to played quickly. To cue a video, hold down Alt and then click on the video you want to cue.
If you’re unsure if a video you’re playing has timecode, ask the director.
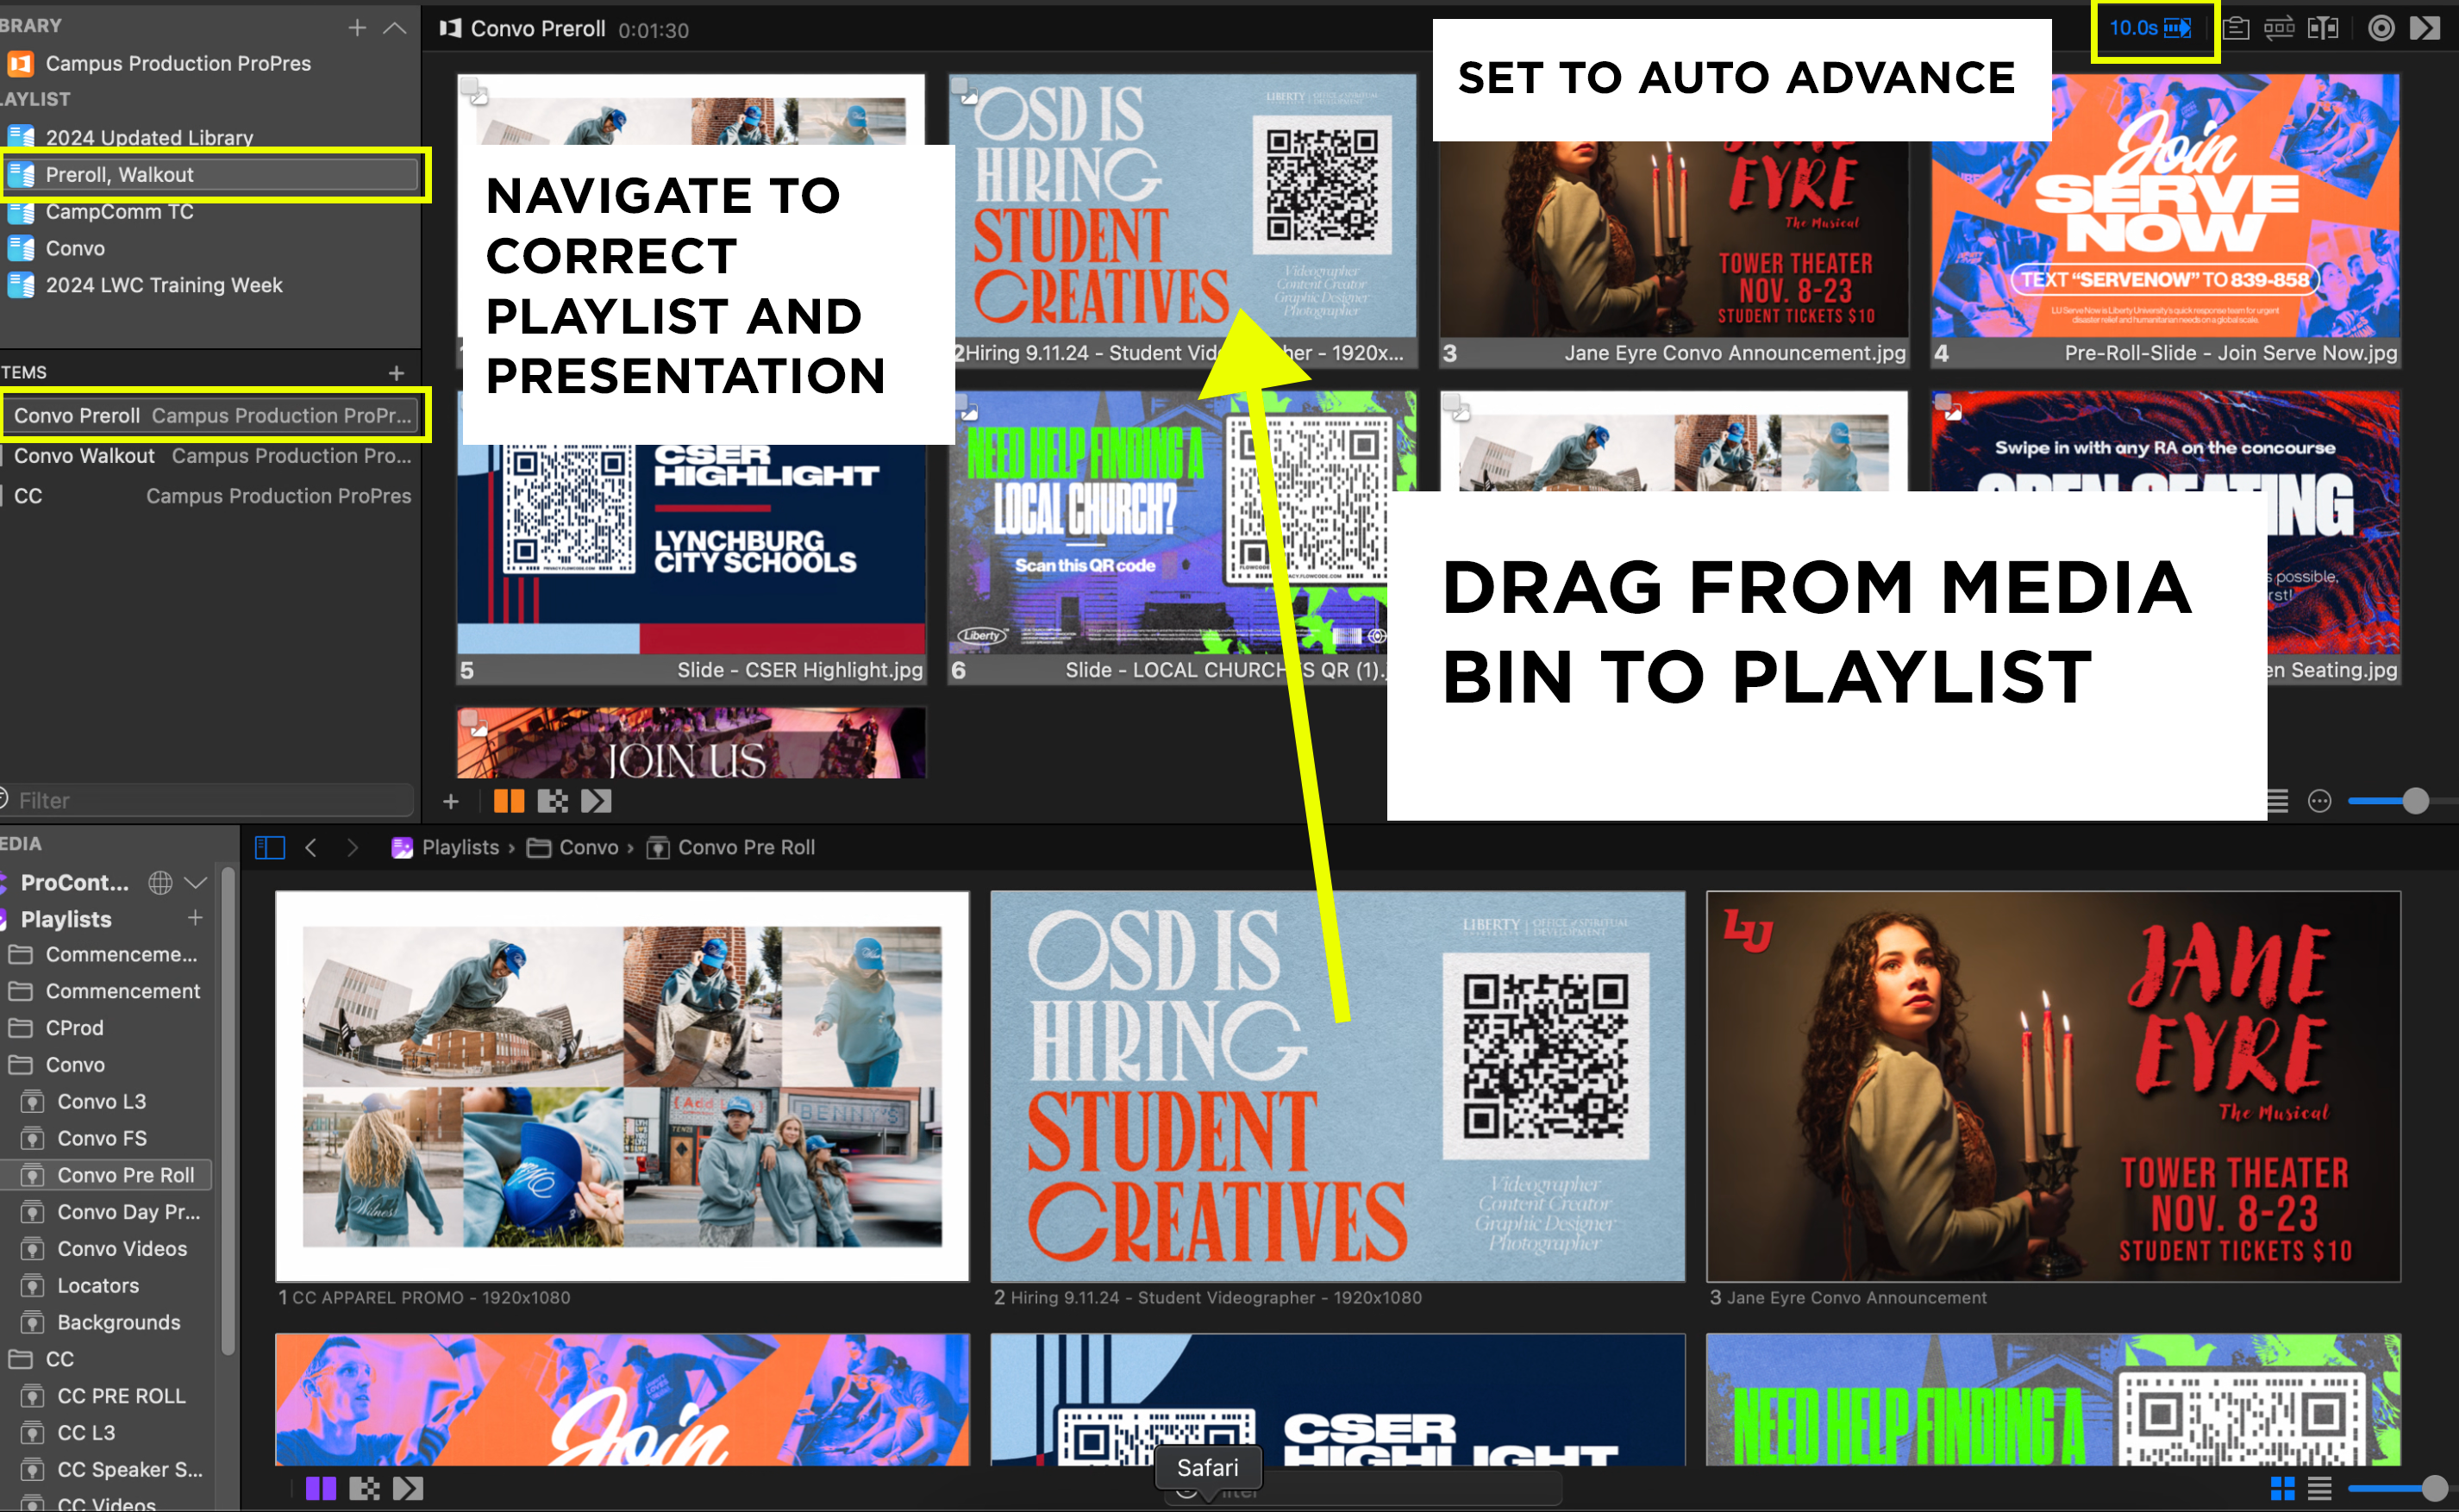
Preroll
Preroll refers to the slides that we put on IMAG as people are walking in. Here is how to create a preroll loop of slides:
- Ensure all desired content is in the Convo Preroll Smart Playlist
- Drag content from Media Bin to Convo Preroll Playlist
- Set to auto advance every 8 seconds
Terminology
Make sure you’re comfortable and understand the following commands, as you’ll need to listen to these for show:
Director to Technical Director (TD): Inserting your Mac (Insert, Lose)
- “Standby to insert Mac 1” “Insert”
- This is making your Mac source live
- “Standby to lose Mac 1” “Lose”
- This is doing the opposite
- “Standby to insert lyrics” “Insert”
- This is making Mac 2 (lyrics) live
Director to Content: Cueing content (Cue)
- “Cue intro video on Mac 1”
- “Cue Dondi Costin lower third on Mac 1”
Director to Content: Playing content
- “Standing by ____ video” “Roll in 3, 2, 1, ROLL”
- Used for videos
- “Animate”
- Typically used for lower thirds
- “Push”
- You’ll go to the next slide when this is said
- “Put up the 24-Hour Prayer slide on Mac 1”
- You’d immediately display this slide once you find it
Director to Content: Letting you know your machine is no longer live (Clear)
- “Mac 1 is clear”
- “Mac 2 is clear”
- “Lyrics are out”