Focus Tools
Keeping focus is critical for a camera operator. Each operator has their personal preference with the various focusing tools available.
In this article, we explain each focusing method in detail. It is up to the camera operator to determine which will work best for their needs. These methods aren’t mutually exclusive: you can use one, two, or all of them.
Focus numbers
In the top right of the viewfinder, a number from 0-255 will display as you rotate your focus wheel. The number will change as the focus moves.
Before the show, zoom in to different points around the stage and memorize the focus numbers for each corner of the stage. Remembering these numbers will greatly assist your ability to keep focus, even when the subjects move or change.
Peaking
Another method of gaining critical focus is to utilize peaking. The basic idea behind peaking is to outline the sharp parts of the image with a color, resulting in the image looking sharper to the eye. The more that the image is in focus, the more peaking will cover the image. Use peaking as a guide for focus. Zoom into your subject, and roll your focus. Only stop when you’ve found the sharpest part of the image. When using focus peaking, the image will appear to pop and you will be able to clearly identify where your focus plane is at.
Peaking is controllable via the monitor or eyepiece menu. For small build and big build cameras, the monitor will have a menu button. For handhelds, the menu button is located on the back of the eyepiece. There are two different versions of peaking: standard and peaking plus.
Standard peaking
This is the most basic form of peaking. There are three different sensitivities for peaking: L, M, H. Cycle through each one to find the right amount of peaking for your needs. M typically fits most scenarios.
Peaking plus
This is a newer form of peaking. It allows the operator to change the color of peaking, set different sensitivity levels, and create regions of the image where peaking will appear (and where it will not).
For those working in a sports setting where the camera is shooting into direct sun, some operators have found that red peaking mixed with a slightly desaturated viewfinder, grants the operator greater ease in following the ball. This may be especially helpful for cameras who are on tight play-by-play follows.
For viewfinders on small builds and builds, the peaking knob on the right of the screen will be the master control. For handhelds, the small knob at the front of the eyepiece controls peaking. Rotate these knobs to dial the appropriate amount of peaking to your needs.
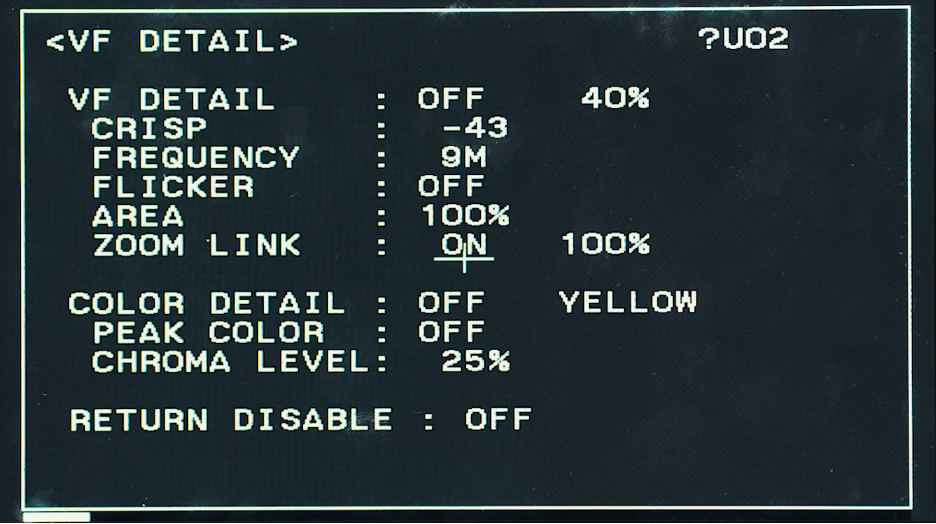
Viewfinder detail
Viewfinder detail works the same way as peaking, but instead of controlling it through the viewfinder or eyepiece, it is controlled through the camera’s menu. On most Sony broadcast cameras, Page 1 of the user menu contains settings for VF Detail.
Here is an explanation of the different settings available on the VF Detail menu page:
| Setting | Description |
|---|---|
| Master On/Off | Allows the operator to change the master strength value. |
| Crisp | Controls the sharpness of the peaking. |
| Frequency | Adjustment for thicker/thinner VF detail lines; controls image threshold sensitivity. |
| Flicker | Adds modulation to the VF detail signal. |
| Area | Determines the area of the frame where the peaking will be shown. |
| Zoom Link | Changes the VF detail level according to the zoom position. |
| Color Detail | Changes the color of the peaking (Blue, Red, Yellow). “Off” returns to white. |
| Peaking Color | Enables or disables color peaking. |
| Chroma Level | Controls the saturation of the image behind VF detail. |
| Return Disable | Enables or disables VF detail on the return video feed. |
VF detail may or may not be necessary for your use case. Most camera operators prefer to use VF detail because it can be mapped to an assignable button for quick access during show.
On Page 9 of the camera menu, operators can change the Assign 3 button to “VF detail.” Located on the side of the camera next to the lens, the assignable function buttons are easy to find when in a handheld configuration, making VF detail a useful option.
Conclusion
This article has outlined three different methods of focus: focus numbers, peaking, and viewfinder detail.
| Method | How It Works | Control Location | Best Use Case |
|---|---|---|---|
| Focus Numbers | Displays a numerical focus value (0–255) | Viewfinder (top right) | Recalling preset focus points |
| Peaking | Outlines sharp areas with color overlay | Monitor/Eyepiece menu or knob | Quickly finding sharp focus visually |
| VF Detail | Enhances edge sharpness directly in the viewfinder signal | Camera user menu (Page 1) | Precision, assignable button use |
However, the most essential tool for getting sharp focus is constant practice. Use these tools to aid you as you become more familiar with operating a broadcast camera. As you progress in your skills, you will begin to find focus as an instinctual process.