Camera Training
In this guide, you will learn how to cover the game effectively and work smoothly with your director and crew. Before we get into specific camera assignments, we will cover some basic industry terms that you will hear throughout every broadcast.
Terms
- Pan – move the camera left or right
- Tilt – move the camera up or down
- Truck – physically move the camera left or right
- Push – zoom in
- Pull – zoom out
- Snap in, snap out – zoom in or out quickly
- Tight – a close up shot
- Wide – a distant shot
- Hero – the person to highlight
- Villain – the opposing player in contrast
- Shag – follow the puck
- ISO – stick with the player the director has asked you to follow until cleared
- Force the cut – stay with the player you are currently on while live during gameplay until the director cuts away from you
Camera assignments
Now that you are familiar with the core terminology, we will break down each camera’s role during a show.
Camera plot
Below is a diagram showing the layout of the cameras throughout the rink.
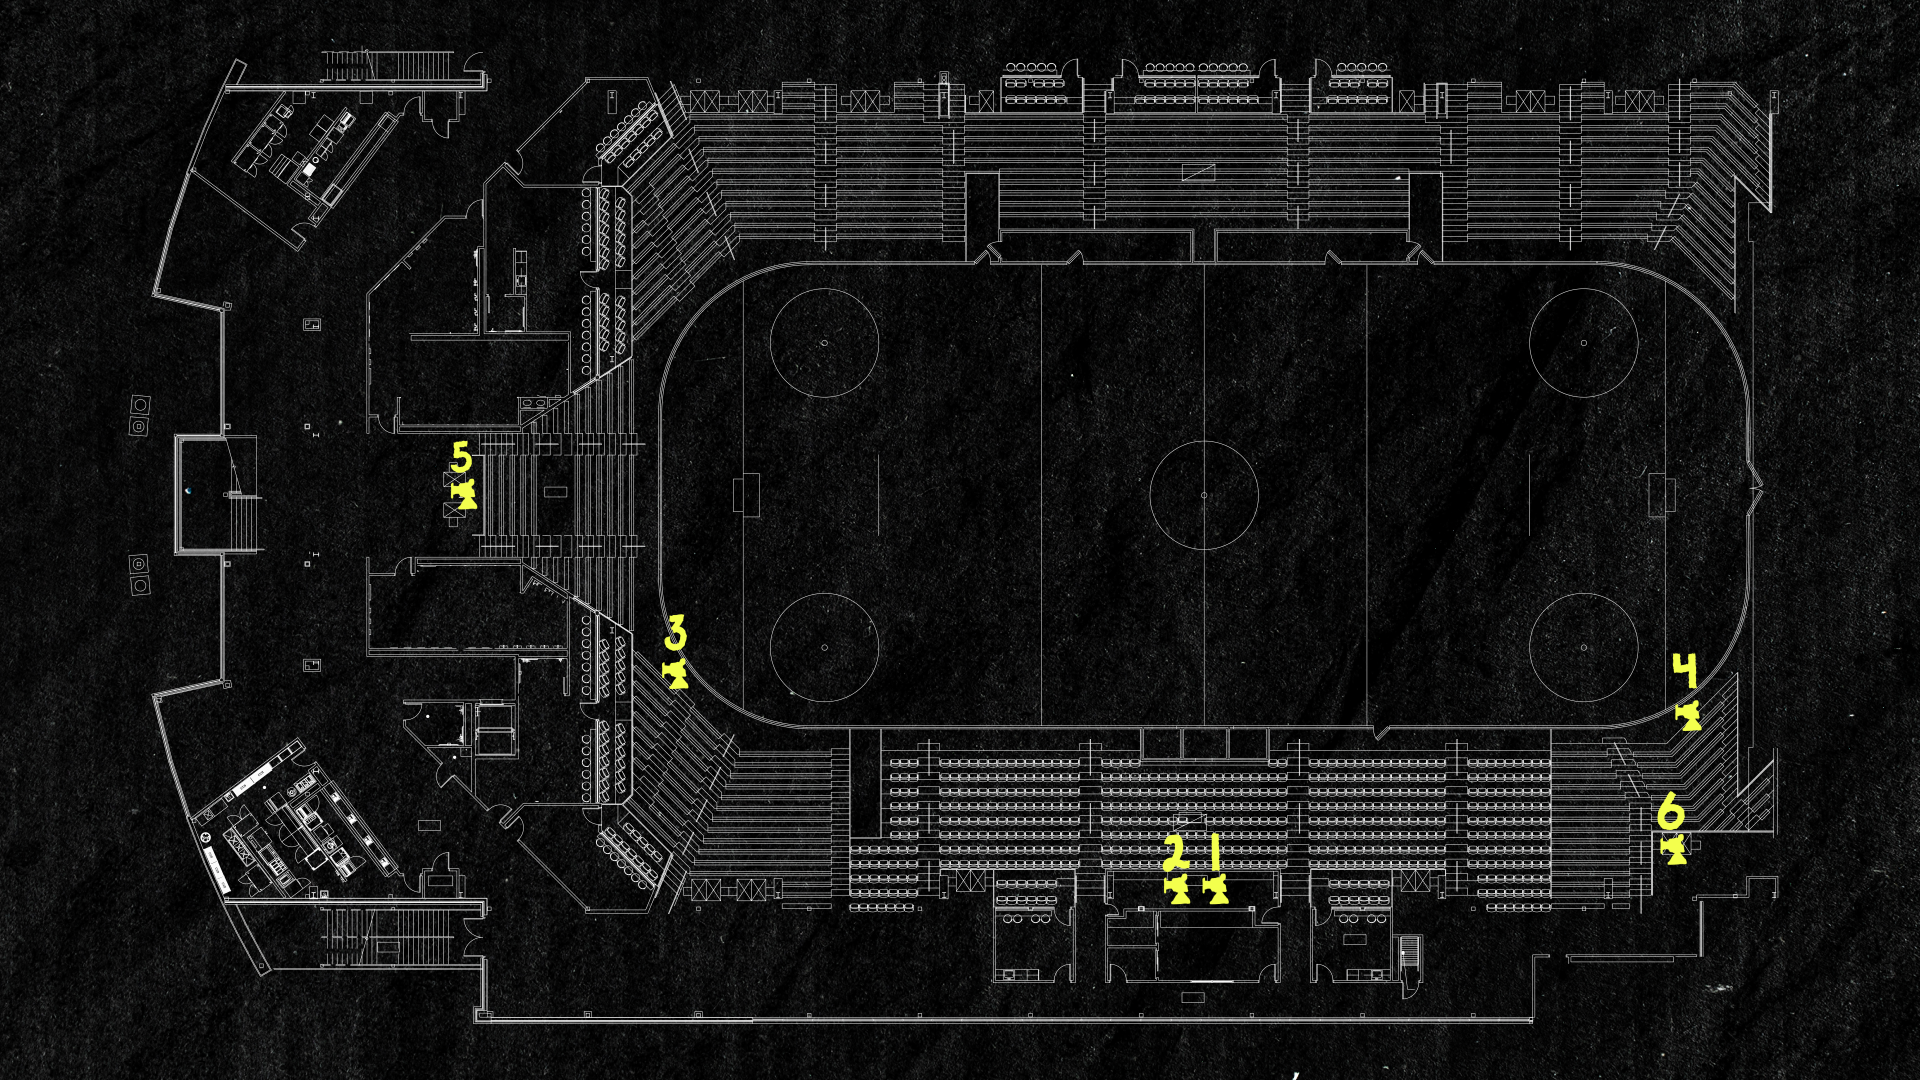
Camera 1
We will begin with Camera 1, also known as the game camera or play-by-play.
It’s located at the top of the seating area and is live for most of the broadcast.
Your job is to follow the play, ensuring it is done smoothly and with proper framing.
In general, the top of your frame will line up with the top of the far side baseboards. The bottom of the scorebug will line up the top of far side glass. The bottom of your frame will line up with the bottom of the near baseboards.
As the play moves, pan in that direction quickly but smoothly.
When a goal is scored, zoom in on the goalie and hold that shot. When the director cuts away from you, reset and prepare for the next faceoff, as you always need to be ready to cover it. Ensure you include all players on that side of the ice when shooting faceoffs.
Camera 2
Camera 2, known as the tight follow, is positioned next to Camera 1.
Your job is to follow the action more tightly. Follow the player with the puck and their defender head-to-toe until the puck is passed to another player. Then, follow the new player.
The puck changes direction quickly, so I recommend to follow the player and puck wider than you’d think.
When play is paused, look for relevant players that were involved in the action or that talent are talking about. Follow them waist-up. On penalties, follow the player who committed the penalty and be ready to follow them to the penalty box.
You can also frame up faceoffs tight as an alternate angle for the director.
Cameras 3 & 4
Cameras 3 and 4 are handheld and located in the corners of the rink at ice level.
Your job as a handheld operator is to follow the action around your goal, as well as the action on the opposite end of the ice.
When players are close to you, continue to follow the puck, but don’t hesitate to cover players fighting along the baseboards…especially if they are in front of you. When the play moves to the opposite end of the ice, continue to follow the puck. If a goal is scored at the opposite end, a shot of the bench or celebrating fans is a great cutaway. Cameras 3 and 4 are also responsible for covering most reporter standups and interviews. Here’s what that should look like.
Camera 5
Camera 5 is on the left side of the rink on the concourse.
Your job is to loosely follow the puck and highlight player movement. Always make sure the goal is within frame.
This angle works well for replays, especially when analysts want to break down how a play developed.
Sometimes, Camera 5 is used for “beauty” shots. These are wide angle shots that highlight the rink and the crowd. Have a few of these shot ideas in your mind, so when your director calls for one, you can execute quickly.
Camera 6
Camera 6, known as the slash, is on the right side of the rink on the concourse.
Your job is to follow the puck with a medium-tight framing: tighter than Camera 5, but not as tight as Camera 2.
On goals, follow the scorer or the coach of the scoring team. On saves, show the player who took the shot. On penalties, get a shot of the penalized player or their coach.
When a penalty ends, cover the penalty box and follow the player as they re-enter the ice. This helps signal that the power play has ended.
That covers everything you need to get started. If you have any questions, don’t hesitate to ask your tech manager. Have a good show!