A2 Fundamentals
An A2 is the mixer’s (A1) representative outside the truck. You are the “hands”. The goal is to make sure all audio elements and communication operate seamlessly during the production.
Definitions
Here are a few definitions. No work like this can capture every situation; the intent is to provide a basic overview.
Stick mic: A handheld microphone. Most often this will be a dynamic mic.
IFB: stands for Interruptible FoldBack. This circuit provides program audio to Talent, which can be “interrupted” by producers and directors to provide direction and cues.
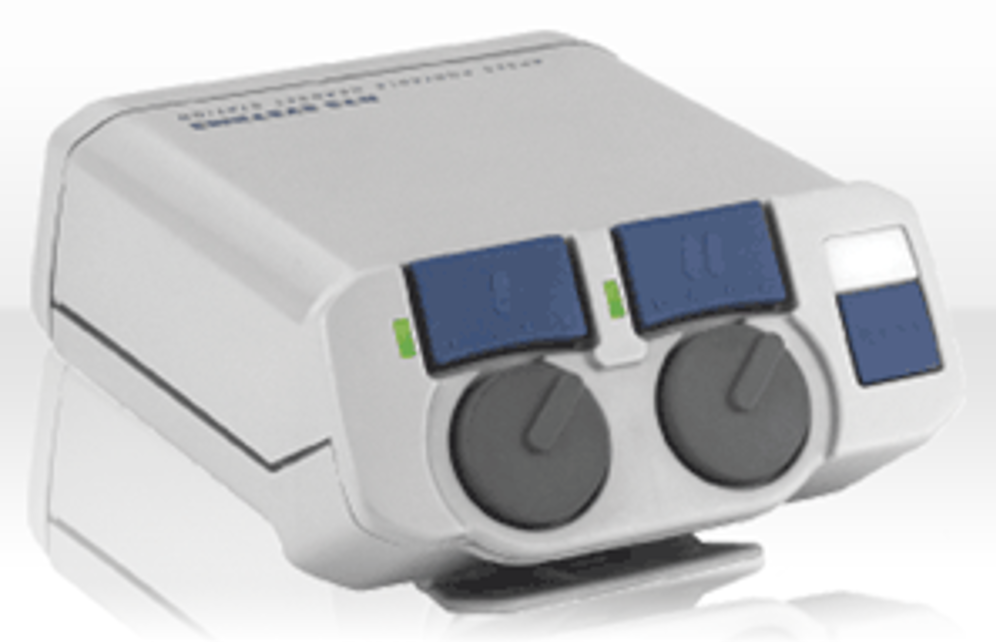
IFB Box: Sometimes called a “4030 box” to (its model number). This is the hardware for the IFB circuit. It is powered from the truck by 32 volts dc. The power travels down pin #2 of the XLR line. When powered the green led is lit.

There are three connectors on the bottom of an IFB Box:
- 3 pin XLR female marked LINE. This is the input to the device.
- A ¼” TRS (tip, ring sleeve) female jack marked STEREO. This is a stereo output where a headset is connected.
- A ¼” TRS female jack marked MONO. This is a mono output where a “TELEX” or “Earbud” can be connected.
Telex: An earphone that can be used by talent. There are several parts to these.
- The driver or “button” is a small speaker. These come in various impedances from 125 to 2k. The lower the impedance of the driver; the louder the sound that can be reproduced.
- The wire has a ¼” male TRS connector to connect to the IFB box.
- The “air column”: a hollow clear plastic tube which connects the driver to the ear. This is a way of letting the talent be stealthy about listening, since it cannot be seen when placed in the ear.
PL: An intercom circuit for two way communication between crew. In television and theater environments the system is “full duplex” meaning both parties can both talk and listen at the same time.
PL Box: Sometimes called a “325 box” (the model number). A two channel intercom station which is wired using a 3 pin XLR connector. These are the standard in television because of their flexibility to be configured just how the user prefers. The box is powered by 32 volts DC on pin 2.
- XLR4F connector: for use with a “mono” or single muff headset
- XLR3M connector: marked “LINE LOOP” used for input or output depending on its configuration. A program feed can be placed here and controlled by the rotary ”PGM” knob (when configured)
- XLR3F connector: marked “LINE INPUT” used for input of the intercom line.
- XLR5F connector: used for a “stereo” or double muff headset
Dry pair: telephone wires have no voltage from the phone company. When voltage is present they are referred to as wet. Dry pair are used over long distances or in instances where using other wires are not practical.
Connection of dry pair varies depending on the equipment and its use. Always remember it takes two wires. The connection uses a binding post to XLR adaptor. Generally a female XLR is used for the mic. A male XLR is used for both IFB and PL. Using the right connectors without turnarounds always helps since you will be less likely to make a mistake.
There are color codes to help determine the “ring” and “tip” of the pairs, about all this knowledge is good for is getting drinks from an impressed phone guy. The best practice is wire it until it works, despite the color.
The wiring is as follows:
- Mic: Pin 2 and Pin 3
- IFB: Pin 1 and Pin 2
- PL: Pin 1 and 2 or Pin 3. Here we sometimes “strap” (wire two pins) pin 2 and 3 so no matter which channel the person uses on the beltpack they it will work.
Line amp: A battery powered box which increases the gain of the mic to line level. The output side is sent back to the truck and the input side is connected to the mic. These are used when the distance is great and almost always when using dry pair.
Married pair: Two XLR cables taped or “married” together. Ideally each cable is reversed in direction so both male and female connectors are at both ends. The mic is connected to the female and the IFB is connected to the IFB BOX (4030). When putting this cable together it is ideal to make the microphone line at the talent end about 3 feet longer.
DT12: A 12 pair multi cable. This cable is named for the connector. These are latched on to the I/O of the truck. Care should be taken to line the connector up using the guide mark. Seat the connector firmly before locking. The male (pins) side has the collar which locks by rotating clockwise (spin left to right). So when the male is on the I/O it will spin counter clockwise (spin right to left).
I/O: The point where all the cables go IN or OUT. The Truck I/O is often located on the rear of the truck. The Building I/O is where all the cables terminate. Here you will find the lines from various points such as the Booth and the Field
DT Fan: A fanout which breaks the DT12 out to 12 individual XLR connectors. Often times you will find they are colored. Here is the color standard.
1: Brown 2: Red 3: Orange 4: Yellow 5: Green 6: Blue 7: Violet 8: Grey 9: White 10: Black 11: Brown 12: Red
Booth:* The place where the show Talent works.
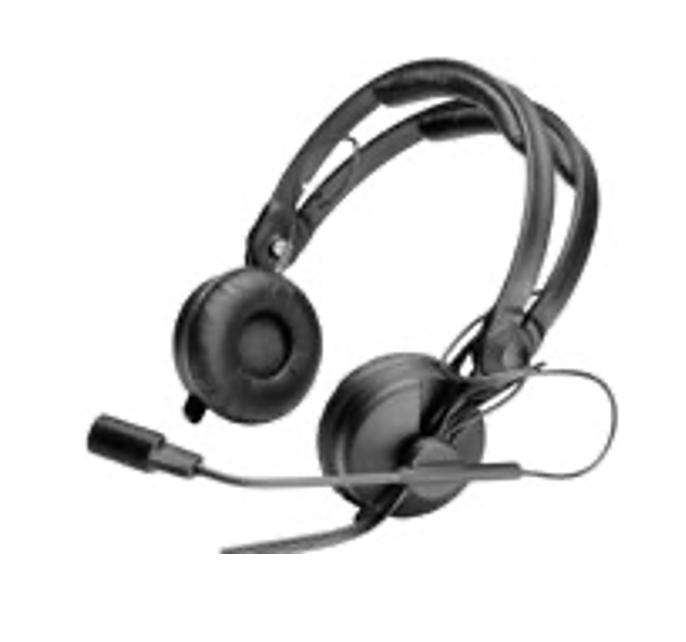
Announce headset: : A microphone and stereo headphones worn by the talent.
Daltech: An Announcer box that incorporates the “announce headset” and an IFB circuit.
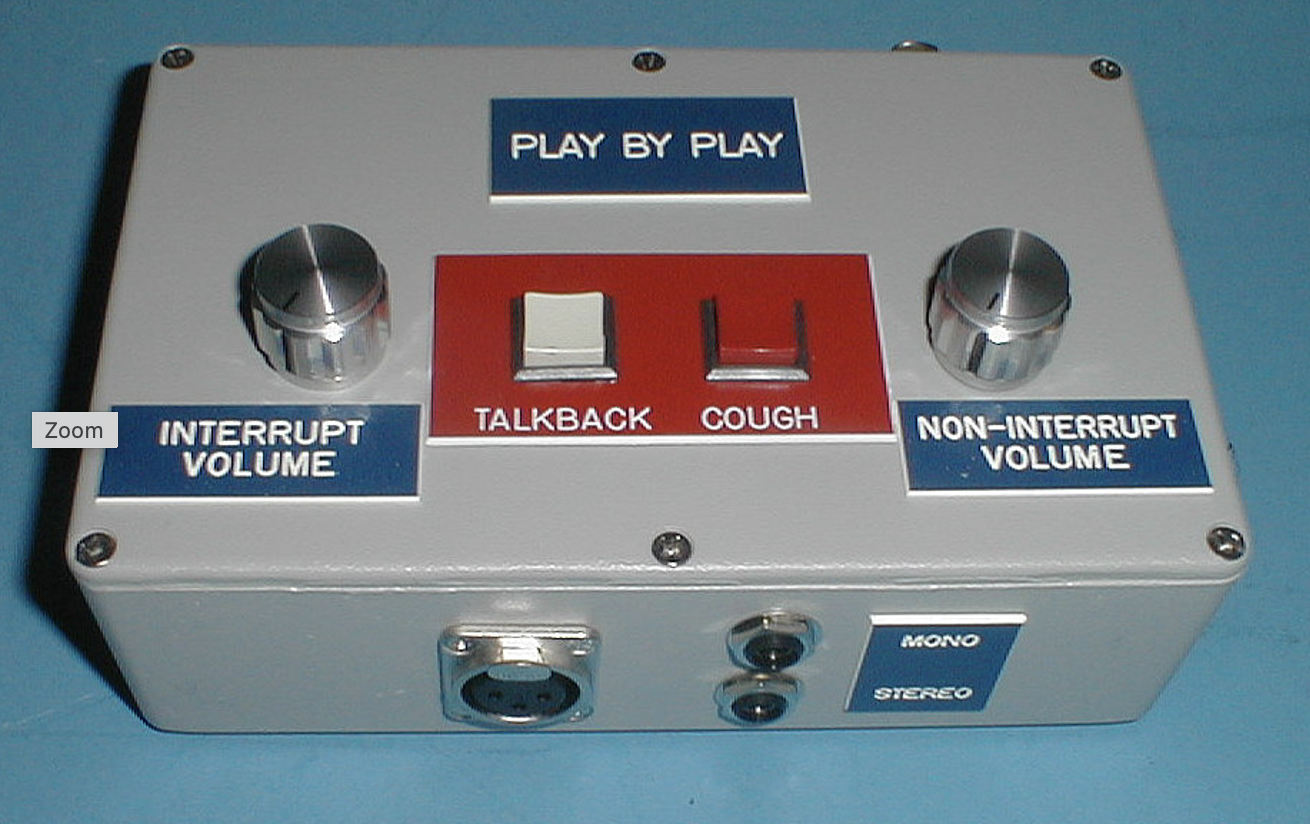
The two button box has two push buttons on top. The left button marked talkback mutes the mic to the “air” sending it the truck via a dedicated talkback circut. The additional button is a cough switch only. When it is depressed the mic is muted to the air circuit and the talkback circuit. Both the one button and two button boxes have 3 pin XLR connectors for the microphone input and 2 - 1/4” jacks for the headset ear piece. One jack is mono or interrupt only and one jack is stereo with interrupt audio in one ear and non interrupt audio in the other ear. Some models have been modified with a XLR6F connection to accept an announce headset without use of an adaptor. This is wired in parallel to the mic and headset jacks on the front panel.

The connectors on the rear side of the box are labeled and interface the box to the appropriate circuit. The red led indicates IFB voltage is present to power the circuit.
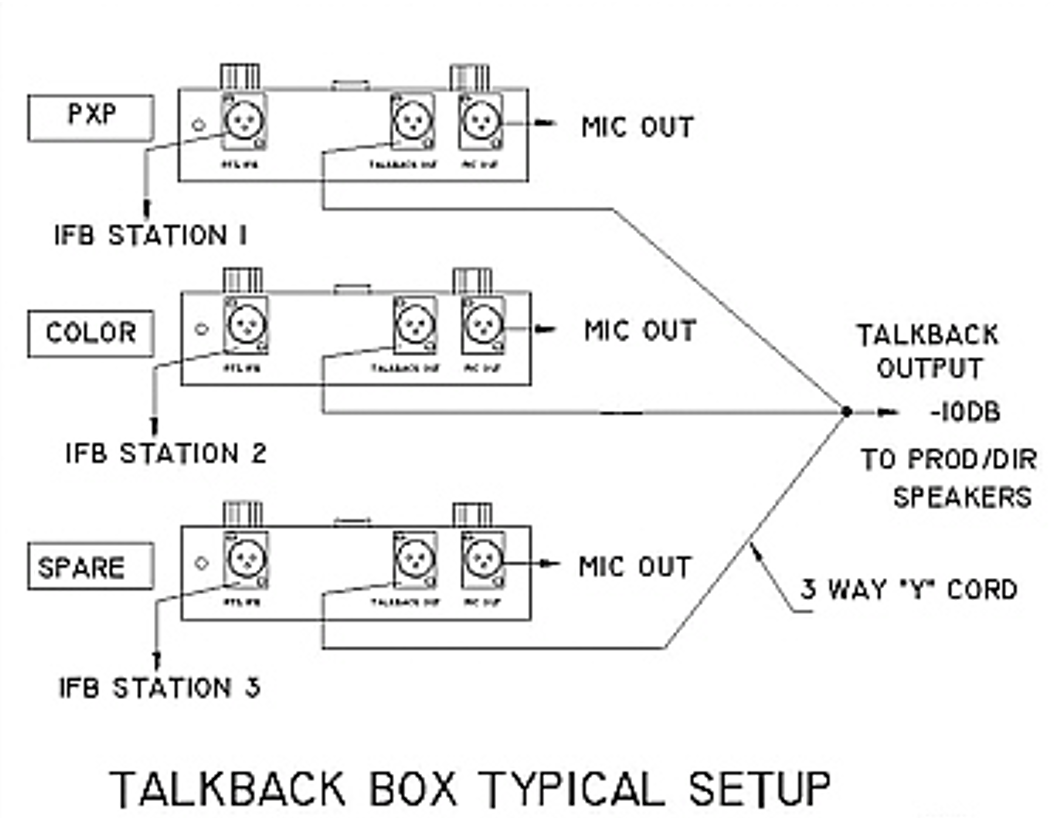
Here is a diagram from the Daltech website which illustrates the typical wiring scheme used in the Booth.
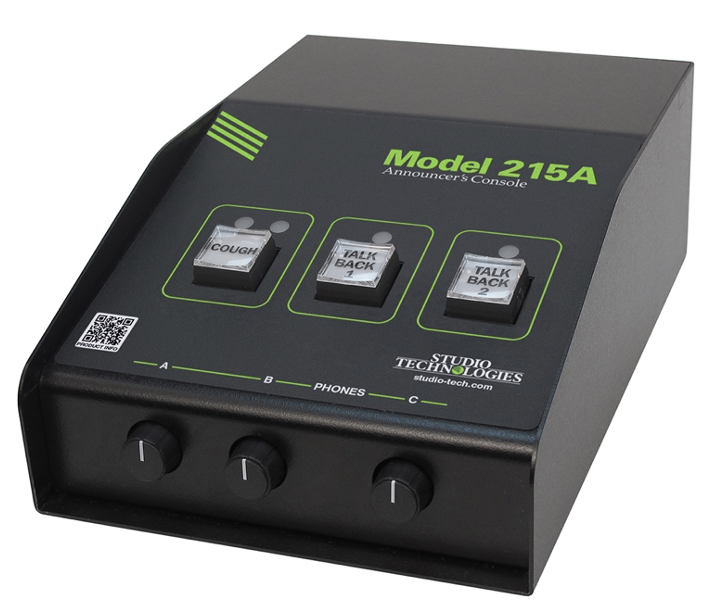
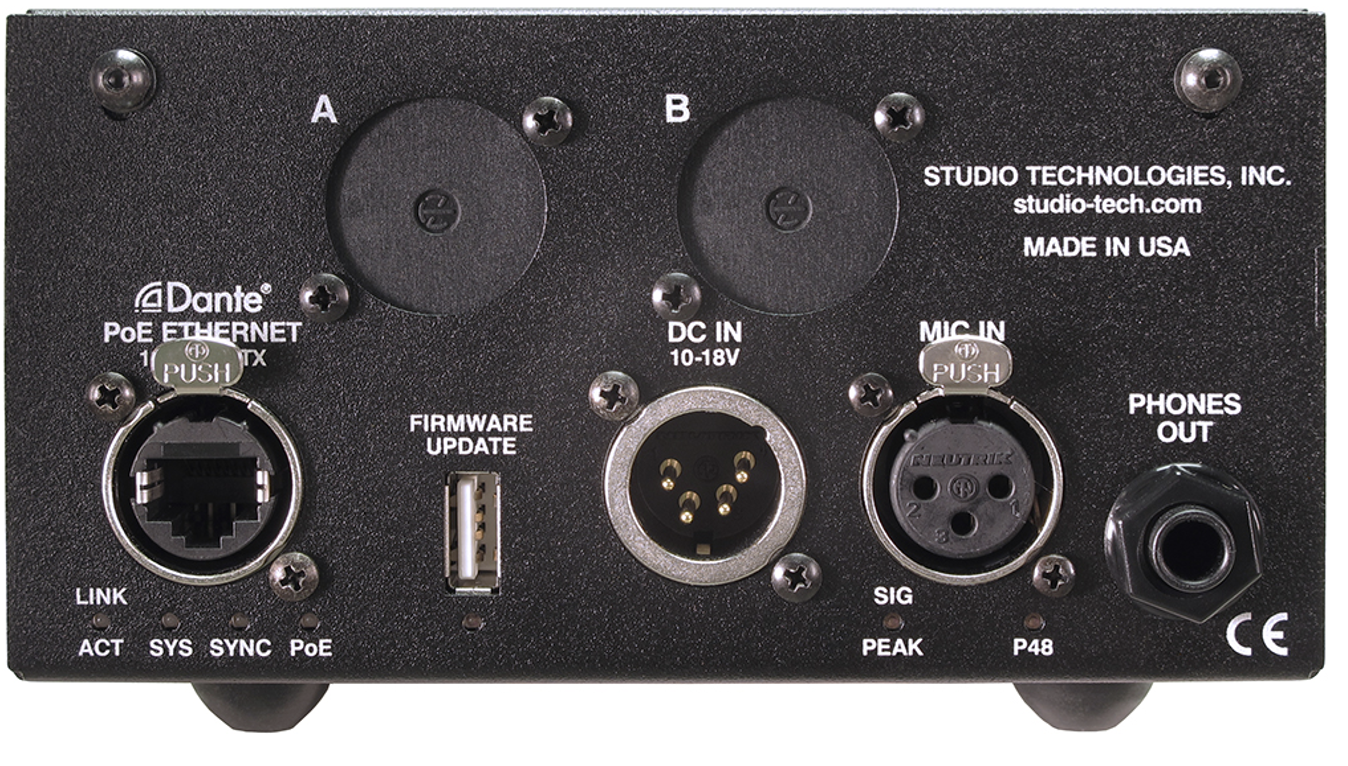
Studio Technologies Box: Similar to a Daltec box, however this uses a network cable to power and provide signal inside the box. It can be powered over ethernet (PoE) or by DC voltage. Typically, only 1 mic input and 1 headphone output.
Q-Box: Audio Line Tester / Cable Tester / Test Tone Generator made by Whirlwind. This is essential for your toolkit.
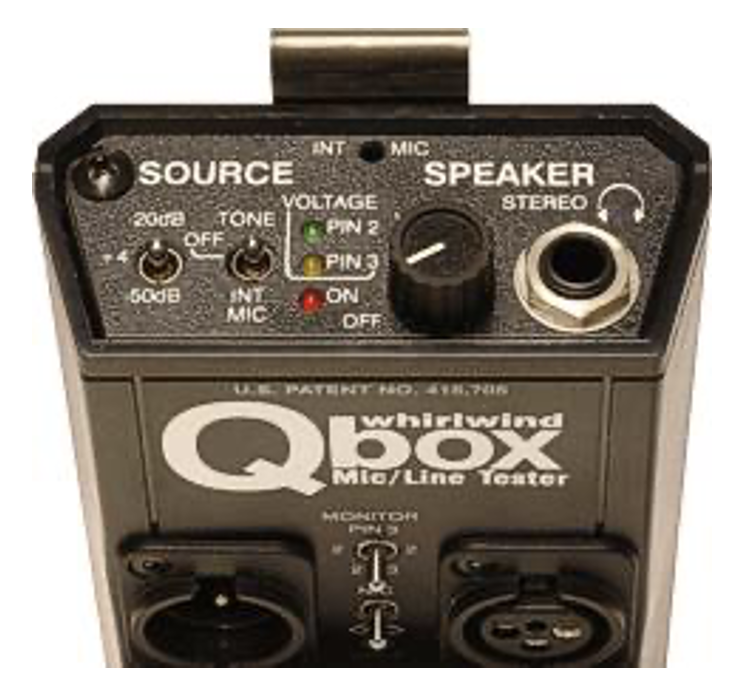
- Source: Selects output level
- Tone: Selects either the tone generator or the internal mic as a source.
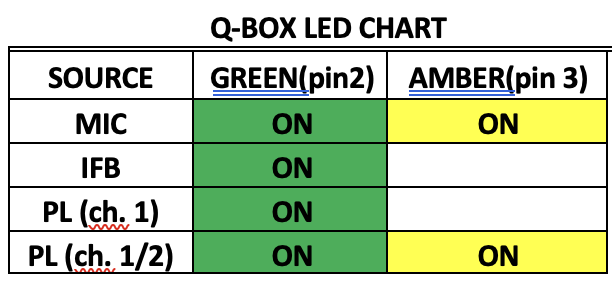
- Voltage LEDs: Indicate the presence of voltage on the line.
- Monitor: Allows selection of listening to signal on Pin 2, Pin 3, or both pins together.
- Split: Allows XLR connectors to be split or connected.
Good practices of an A2
- Arrive a little early and walk around to determine the layout of things.
- How many cables (DT12’s) are needed from the truck?
- What are they likely to be used for?
- When patching the DT’s from the stadium to the truck what cross patching will be needed? Remember the A1 mixing the show will want things to appear at the truck as written on his or her sheet because of how the show is organized. Keep things simple and use the same “system” each time if you can. Make things easy for yourself.
- Document and label as much as possible. Troubleshooting is easier if you can look at notes and labels.
- If available use Y adaptors and extra PL Boxes so you can place an A2 PL at each I/O panel. More work but a lifesaver when the stuff gets wild.
- Always have a Telex and a Q-box with you.
- Carry at least 4 turnarounds of each type.
- A “greenie”
- A small Phillips screwdriver
- Dykes
- Small tie wraps
- Sharpies
- A ballpoint pen
- Spare batteries ( AA and 9 volt)
- Rope
- Tape (duct and label tape, electrical)
- A small flashlight
- Gloves
- Water
- A “635” microphone from the truck (or similar dynamic type microphone for testing a line with your voice).